
The Basics of Google Cloude Compute


1. CLOUD IAM: QWIK START (GSP064)
Overview
Google Cloud’s Identity and Access Management (IAM) service lets you create and manage permissions for Google Cloud resources. Cloud IAM unifies access control for Google Cloud services into a single system and provides a consistent set of operations.
In this lab, you sign in with 2 different sets of credentials to experience how granting and revoking permissions works from Google Cloud Project Owner and Viewer roles.
Objectives
- Assign a role to a second user
- Remove assigned roles associated with Cloud IAM
Prerequisites
This is an introductory level lab. Little to no prior knowledge of Cloud IAM is expected. Experience with Cloud Storage is helpful to complete the tasks in this lab, but is not required. Make sure that you have a file in .txt or .html available. If you are looking for more advanced practice with Cloud IAM, be sure to check out the following Google Cloud Skills Boost lab, IAM Custom Roles.
Once you’re prepared, scroll down and follow the steps to get your lab environment set up.
Setup and Requirements
As mentioned earlier, this lab provides two sets of credentials to illustrate IAM policies and what permissions are available for specific roles.
In the Lab Connection panel on the left side of your lab, you see a list of credentials that resembles the following:
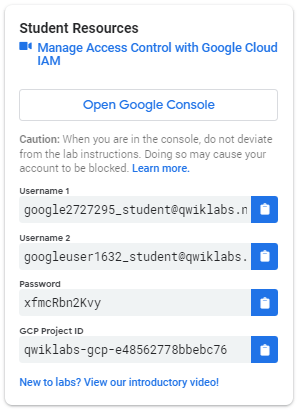
Notice that there are two usernames: Username 1 and Username 2. These represent identities in Cloud IAM, each with different access permissions allocated to them. These “roles” set constraints on what you can and cannot do with Google Cloud resources in the project you’ve been allocated.
Sign in to Cloud Console as the first user
- Click on the Open Google Console button. This opens a new browser tab. If you are asked to Choose an account, click Use another account.
- The Google Cloud sign-in page opens. A Sign in page opens—copy and paste the Username 1 credential that resembles
googlexxxxxx_student@qwiklabs.netinto the Email or phone field and then click Next. - Copy the password from the Lab Connection panel and paste it into the Google Sign-in password field.
- Click Next and then Accept the terms of service. The Cloud Console opens. Agree to the terms of service and click Agree and Continue.
Sign in to Cloud Console as the second user
- Click on the Open Google Console button again. A new browser tab opens. If you are asked to Choose an account, click Use another account.
- The Google Cloud sign-in page opens. Copy and paste the Username 2 credential that resembles
googlexxxxxx_student@qwiklabs.netinto the Email or phone field and then click Next. - Copy the password from the Lab Connection panel and paste it into the Google Sign-in password field.
- Click Next and then Accept the terms of service. The Cloud Console opens. Agree to the terms of service and click Agree and Continue.
You should now have two Cloud Console tabs open in your browser—one signed in with Username 1 and the other with Username 2.
View or reset the user in a browser tab
Occasionally, a user is overwritten in a browser tab or you may be confused about which user is signed into which browser tab.
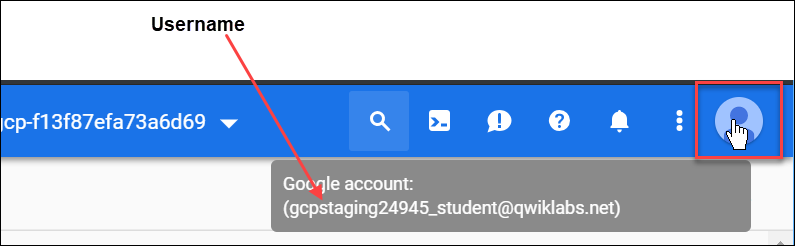
To view which user is signed into a browser tab, hover over your Avatar to view your username in that browser tab.
To reset which user is signed into a browser tab:
- Click your Avatar and click Sign out to sign out.
- In the Lab Connection panel, click Open Google Console and sign in back using the appropriate Username and Password.
Task 1. Explore the IAM console and project level roles
Return to the Username 1 Cloud Console page.
Select Navigation menu > IAM & Admin > IAM. You are now in the “IAM & Admin” console.
Click +GRANT ACCESS button at the top of the page.
Scroll down to Basic in Select a role section and mouse over.
There are three roles:
- Editor
- Owner
- Viewer
These are primitive roles in Google Cloud. Primitive roles set project-level permissions and unless otherwise specified, they control access and management to all Google Cloud services.
The following table pulls definitions from the Google Cloud IAM article, Basic roles, which gives a brief overview of browser, viewer, editor, and owner role permissions:
| Role Name | Permissions |
|---|---|
| roles/viewer | Permissions for read-only actions that do not affect state, such as viewing (but not modifying) existing resources or data. |
| roles/editor | All viewer permissions, plus permissions for actions that modify state, such as changing existing resources. |
| roles/owner | All editor permissions and permissions for the following actions: - Manage roles and permissions for a project and all resources within the project. - Set up billing for a project. |
Since you are able to manage roles and permissions for this project, Username 1 has Project owner permissions.
Click CANCEL to exit out of the “Add principal” panel.
Explore the editor role
Now switch to the Username 2 console.
Navigate to the IAM & Admin console, select Navigation menu > IAM & Admin > IAM.
Search through the table to find Username 1 and Username 2 and examine the roles they are granted. The Username 1 and Username 2 roles are listed inline and to the right of each user.
You should see:
- Username 2 has the “Viewer” role granted to it.
- The +GRANT ACCESS button at the top is grayed out—if you try to click on it you get the message,
“You need permissions for this action. Required permission(s): resource manager.projects.setIamPolicy”.
This is one example of how IAM roles affect what you can and cannot do in Google Cloud.
Switch back to the Username 1 console for the next step.
Task 2. Prepare a Cloud Storage bucket for access testing
Ensure that you are in the Username 1 Cloud Console.
Create a bucket
Create a Cloud Storage bucket with a unique name.
From the Cloud Console, select Navigation menu > Cloud Storage > Buckets.
Click +CREATE.
Note: If you get a permissions error for bucket creation, sign out and then sign in back in with the Username 1 credentials.
Update the following fields, leave all others at their default values:
| Property | Value |
|---|---|
| Name: | globally unique name (create it yourself!) and click CONTINUE. |
| Location Type: | Multi-Region |
Note the bucket name. You will use it in a later step.
Click CREATE.
If prompted, Public access will be prevented, click Confirm.
Note: If you get a permissions error for bucket creation, sign out and then sign in back in with the Username 1 credentials.
Upload a sample file
On the Bucket Details page click UPLOAD FILES.
Browse your computer to find a file to use. Any text or HTML file will do.
Click on the three dots at the end of the line containing the file and click Rename.
Rename the file ‘sample.txt’.
Click RENAME.
Verify project viewer access
Switch to the Username 2 console.
From the Console, select Navigation menu > Cloud Storage > Buckets. Verify that this user can see the bucket.
Username 2 has the “Viewer” role prescribed which allows them read-only actions that do not affect state. This example illustrates this feature—they can view Cloud Storage buckets and files that are hosted in the Google Cloud project that they’ve been granted access to.
Task 3. Remove project access
Switch to the Username 1 console.
Remove Project Viewer for Username 2
- Select Navigation menu > IAM & Admin > IAM.
- Click the pencil icon inline and to the right of Username 2.
Note: You may have to widen the screen to see the pencil icon.
- Remove Project Viewer access for Username 2 by clicking the trashcan icon next to the role name.
- Click SAVE.
- Notice that the user has disappeared from the Member list! The user has no access now.
Note: It can take up to 80 seconds for such a change to take effect as it propagates.
Read more about Google Cloud IAM in the Google Cloud IAM Resource Documentation, Frequently Asked Questions.
Verify that Username 2 has lost access
- Switch to Username 2 Cloud Console.
- Ensure that you are still signed in with Username 2’s credentials and that you haven’t been signed out of the project after permissions were revoked.
- If signed out, sign back in with the proper credentials.
- Navigate back to Cloud Storage by selecting Navigation menu > Cloud Storage > Buckets.
- You should see a permission error.
Note: As mentioned before, it can take up to 80 seconds for permissions to be revoked.
If you haven’t received a permission error, wait 2 minutes and then try refreshing the console.
Task 4. Add Cloud Storage permissions
- Copy Username 2 name from the Lab Connection panel.
- Switch to Username 1 console.
- Ensure that you are still signed in with Username 1’s credentials.
- If you are signed out, sign back in with the proper credentials.
- In the Console, select Navigation menu > IAM & Admin > IAM.
- Click +GRANT ACCESS and paste the Username 2 name into the New principals field.
- In the Select a role field, select Cloud Storage > Storage Object Viewer from the drop-down menu.
- Click SAVE.
Verify access
- Switch to the Username 2 console. You’ll still be on the Storage page.
- Username 2 doesn’t have the Project Viewer role, so that user can’t see the project or any of its resources in the Console.
- However, this user has specific access to Cloud Storage with the Storage Object Viewer role - check it out now.
- Click Activate Cloud Shell (the icon that activates Cloud Shell) to open the Cloud Shell command line.
- If prompted, click Continue.
-
Open up a Cloud Shell session and enter the following command, replacing [YOUR_BUCKET_NAME] with the name of the bucket you created earlier:
gsutil ls gs://[YOUR_BUCKET_NAME] -
You should receive a similar output:
gs://[YOUR_BUCKET_NAME]/sample.txt
Note: If you see AccessDeniedException, wait a minute and run the previous command again.
As you can see, you gave Username 2 view access to the Cloud Storage bucket.
🎉 Congratulations!
In this lab, you exercised granting and revoking Cloud IAM roles to a user.
2. DATA CATALOG: QWIK START (GSP729)
Overview
Data Catalog is a fully managed, scalable metadata management service within Dataplex.
It offers a simple and easy-to-use search interface for data discovery, a flexible and powerful cataloging system for capturing both technical and business metadata, and a strong security and compliance foundation with Cloud Data Loss Prevention (DLP) and Cloud Identity and Access Management (IAM) integrations.
BigQuery is an enterprise data warehouse that enables super-fast SQL queries using the processing power of Google’s infrastructure.
Simply move your data into BigQuery and let us handle the hard work. You can control access to both the project and your data based on your business needs, such as giving others the ability to view or query your data.
Using Data Catalog
There are two main ways you interact with Data Catalog:
- Searching for data assets that you have access to.
- Tagging assets with metadata.
Data Catalog use case
Imagine you are a data engineer in your company. It is your job to ensure all datasets can be easily discovered and used by colleagues, such as data scientists or business analysts. When a new dataset comes in, you annotate it with important information—this could be whether or not it contains PII data, who owns the dataset, how many rows the dataset contains, etc.
You can annotate this information by adding tags to your dataset and tables. Data Catalog allows you to create tag templates to let you define what kind of attributes you want to tag. This allows you to easily access, map, and discover pertinent information from your datasets and tables.
Objectives
In this lab, you will learn how to:
- Enable the Data Catalog API so that you can use this service in your Google Cloud project.
- Create a dataset with BigQuery.
- Copy a public New York Taxi table to your dataset.
- Create a Data Catalog tag template.
- Tag your newly created table with the newly created tags.
Setup and Requirements
Note: Use an Incognito (recommended) or private browser window to run this lab. This prevents conflicts between your personal account and the student account, which may cause extra charges incurred to your personal account.
Note: Use only the student account for this lab. If you use a different Google Cloud account, you may incur charges to that account.
How to start your lab and sign in to Google Cloud Console
- Click the Start Lab button. If you need to pay for the lab, a dialog opens for you to select your payment method. On the left is the Lab Details pane with the following:
- The Open Google Cloud console button
- Time remaining
- The temporary credentials that you must use for this lab
- Other information, if needed, to step through this lab
-
Click Open Google Cloud console (or right-click and select Open Link in Incognito Window if you are running the Chrome browser).
The lab spins up resources, and then opens another tab that shows the Sign in page.
Tip: Arrange the tabs in separate windows, side-by-side.
Note: If you see the Choose an account dialog, click Use Another Account.
-
If necessary, copy the Username below and paste it into the Sign in dialog.
"Username"You can also find the Username in the Lab Details pane.
-
Click Next.
-
Copy the Password below and paste it into the Welcome dialog.
"Password"You can also find the Password in the Lab Details pane.
-
Click Next.
Important: You must use the credentials the lab provides you. Do not use your Google Cloud account credentials.
Note: Using your own Google Cloud account for this lab may incur extra charges.
-
Click through the subsequent pages:
- Accept the terms and conditions.
- Do not add recovery options or two-factor authentication (because this is a temporary account).
- Do not sign up for free trials.
After a few moments, the Google Cloud console opens in this tab.
Note: To access Google Cloud products and services, click the Navigation menu or type the service or product name in the Search field.

Active Cloud Shell
Cloud Shell is a virtual machine that is loaded with development tools. It offers a persistent 5GB home directory and runs on the Google Cloud. Cloud Shell provides command-line access to your Google Cloud resources.
-
Click Activate Cloud Shell at the top of the Google Cloud console.
- Click through the following windows:
- Continue through the Cloud Shell information window.
- Authorize Cloud Shell to use your credentials to make Google Cloud API calls.
When you are connected, you are already authenticated, and the project is set to your Project_ID,
PROJECT_ID. The output contains a line that declares the Project_ID for this session:Your Cloud Platform project in this session is set to "PROJECT_ID"gcloud is the command-line tool for Google Cloud. It comes pre-installed on Cloud Shell and supports tab-completion.
- (Optional) You can list the active account name with this command:
gcloud auth list -
Click Authorize.
Output:
ACTIVE: * ACCOUNT: "ACCOUNT" To set the active account, run: $ gcloud config set account `ACCOUNT` -
(Optional) You can list the project ID with this command:
gcloud config list projectOutput:
 [core]
 project = "PROJECT_ID"
Note: For full documentation of gcloud, in Google Cloud, refer to the gcloud CLI overview guide.
Task 1. Enable the Data Catalog API
From the navigation menu, select APIs and Services > Library.
In the search bar, enter Data Catalog and select Google Cloud Data Catalog API.
Then click Enable.
If you run into the following error after trying to enable the Data Catalog API:
Failed API Enablement error message
- Click Close.
- Refresh your browser tab.
- Click Enable again.
The Data Catalog API should be successfully enabled:
Google Cloud Data Catalog window showing the Data Catalog API overview
Open the BigQuery console
In the Google Cloud Console, select Navigation menu > BigQuery.
The Welcome to BigQuery in the Cloud Console message box opens. This message box provides a link to the quickstart guide and the release notes.
Click Done.
The BigQuery console opens.
Task 2. Create a dataset
In the left navigation pane of BigQuery, click on view actions next to your project ID, then click CREATE DATASET.
The View Actions navigation menu, wherein the option Create dataset is highlighted within the project’s sub-menu.
In the Create Dataset dialog:
- For Dataset ID, enter
demo_dataset - For Data location, select US (multiple regions in United States).
The Create dataset page, wherein the Project ID, Dataset ID, and Data location fields are completed.
Then click Create dataset.
Note: You cannot add a description or a label when you create a dataset using the Cloud Console. After the dataset is created, you can add a description and label.
Task 3. Copy a public New York Taxi table to your dataset.
From the left-hand panel, click + ADD > Public datasets.
In the search bar, enter NYC TLC Trips and click on the result that appears:
The search results, wherein the NYC TLC Trips tile is highlighted alongside the Filter by menu.
For this lab, you will be using a table from this dataset which contains NYC yellow cab trip data from 2018.
Click out of the side panel to close it as soon as you’re ready to continue.
Copy the tlc_yellow_trips_2018 table by running this command in your Cloud Shell panel. Click Authorize.
bq cp bigquery-public-data:new_york_taxi_trips.tlc_yellow_trips_2018 $(gcloud config get project):demo_dataset.trips
The previous command used the bq command-line tool to copy the public table into your project and organized it in the demo_dataset you created earlier.
- Refresh your BigQuery browser page.
- Confirm that the
tripstable is listed in yourdemo_dataset.
You will add Data Catalog tags to the table in the next section.
Task 4. Create a Data Catalog tag template
Create a tag template from the Data Catalog UI.
Open the Navigation menu and click on Data Catalog > Tag Templates. Then click + CREATE TAG TEMPLATE:
The Data Catalog pane, wherein the tag templates option is highlighted, along with the Create template button.
Fill in the template form to define a “Demo Tag Template”.
- Template display name: Demo Tag Template
- Template ID: demo_tag_template
- Location: Region
Next, create four tag attributes (also called tag “fields”).
- Click Add a Field.
-
Create four attributes with the values listed below. Note that the “source” attribute defines a required tag attribute. You can use lower case letters and underscores to define attribute names:
- Field display name: Source of data asset
- Field ID: source_of_data_asset
- Make this field required: Checked
- Type: String
- Click Done.
-
Now click Add a Field and enter:
- Field display name: Number of rows in data asset
- Field ID: number_of_rows_in_data_asset
- Make this field required: Not checked
- Type: Double
- Click Done.
-
Then click Add a Field and enter:
- Field display name: Has PII
- Field ID: has_pii
- Make this field required: Not checked
- Type: Boolean
- Click Done.
-
Then click Add a Field and enter:
- Field display name: PII type
- Field ID: pii_type
- Make this field required: Not checked
- Type: Enumerated
- Add 3 values to this attribute:
- Social Security Number
- None
- Click Done.
The completed tag template form should list the four tag attributes:
Click CREATE.
The Data Catalog Tag template page displays template details and attributes:
Task 5. Tag your table with the newly created tags
To attach a tag to a table in your dataset, click on the Data Catalog icon in the top left corner.
- In the Left pane, select Search and type
demo_datasetin the Search box. -
Click Search:
- The demo_dataset and the trips table that you copied into the dataset are displayed in the search results.
-
Open the trips table by clicking on the name:
- The Entry details page opens.
-
Click ATTACH TAGS.
- From the Attach Tags dialog, under “Choose what to tag” select
tripstable, and click Ok. - Select the Demo Tag Template for tag templates.
- Next, insert or select the following values for each tag attribute:
- source_of_data_asset: tlc_yellow_trips_2018
- pii_type: NONE
- Click Save.
- Click on Demo Tag Template to view the tag attributes listed on the Entry details page.
Congratulations!
Great job! You learned how to successfully attach a tag to a table with Data Catalog.
3. BIGLAKE: QWIK START (GSP1040)
Overview
BigLake is a unified storage engine that simplifies data access for data warehouses and lakes by providing uniform fine-grained access control across multi-cloud storage and open formats.
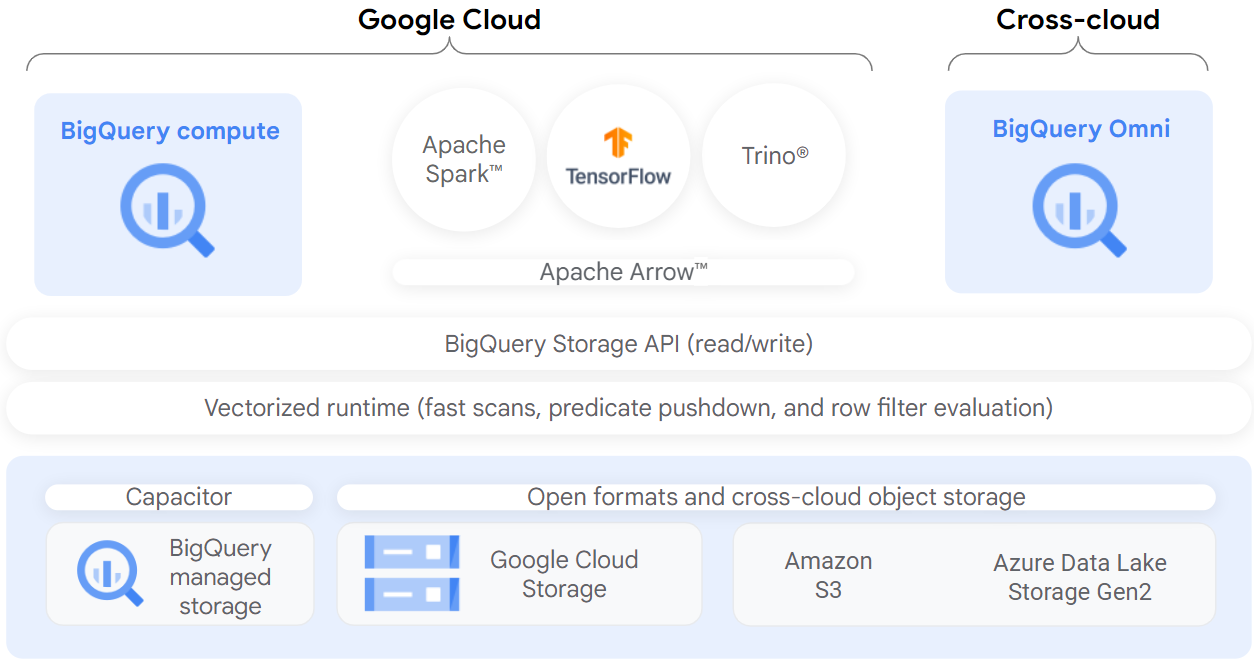
BigLake extends BigQuery’s fine-grained row- and column-level security to tables on data resident object stores such as Amazon S3, Azure Data Lake Storage Gen2, and Google Cloud Storage. BigLake decouples access to the table from the underlying cloud storage data through access delegation. This feature helps you to securely grant row- and column-level access to users and pipelines in your organization without providing them full access to the table.
After you create a BigLake table, you can query it like other BigQuery tables. BigQuery enforces row- and column-level access controls, and every user sees only the slice of data that they are authorized to see. Governance policies are enforced on all access to the data through BigQuery APIs. For example, the BigQuery Storage API lets users access authorized data using open source query engines such as Apache Spark, as the following diagram shows:
Objectives
In this lab, you will:
- Create and view a connection resource.
- Set up access to a Cloud Storage data lake.
- Create a BigLake table.
- Query a BigLake table through BigQuery.
- Set up access control policies.
- Upgrade external tables to BigLake tables.
Setup and Requirements
Note: Use an Incognito (recommended) or private browser window to run this lab. This prevents conflicts between your personal account and the student account, which may cause extra charges incurred to your personal account.
Note: Use only the student account for this lab. If you use a different Google Cloud account, you may incur charges to that account.
How to start your lab and sign in to Google Cloud Console
- Click the Start Lab button. If you need to pay for the lab, a dialog opens for you to select your payment method. On the left is the Lab Details pane with the following:
- The Open Google Cloud console button
- Time remaining
- The temporary credentials that you must use for this lab
- Other information, if needed, to step through this lab
-
Click Open Google Cloud console (or right-click and select Open Link in Incognito Window if you are running the Chrome browser).
The lab spins up resources, and then opens another tab that shows the Sign in page.
Tip: Arrange the tabs in separate windows, side-by-side.
Note: If you see the Choose an account dialog, click Use Another Account.
-
If necessary, copy the Username below and paste it into the Sign in dialog.
"Username"You can also find the Username in the Lab Details pane.
-
Click Next.
-
Copy the Password below and paste it into the Welcome dialog.
"Password"You can also find the Password in the Lab Details pane.
-
Click Next.
Important: You must use the credentials the lab provides you. Do not use your Google Cloud account credentials.
Note: Using your own Google Cloud account for this lab may incur extra charges.
-
Click through the subsequent pages:
- Accept the terms and conditions.
- Do not add recovery options or two-factor authentication (because this is a temporary account).
- Do not sign up for free trials.
After a few moments, the Google Cloud console opens in this tab.
Note: To access Google Cloud products and services, click the Navigation menu or type the service or product name in the Search field.
Active Cloud Shell
Cloud Shell is a virtual machine that is loaded with development tools. It offers a persistent 5GB home directory and runs on the Google Cloud. Cloud Shell provides command-line access to your Google Cloud resources.
-
Click Activate Cloud Shell at the top of the Google Cloud console.
- Click through the following windows:
- Continue through the Cloud Shell information window.
- Authorize Cloud Shell to use your credentials to make Google Cloud API calls.
When you are connected, you are already authenticated, and the project is set to your Project_ID,
PROJECT_ID. The output contains a line that declares the Project_ID for this session:Your Cloud Platform project in this session is set to "PROJECT_ID"gcloud is the command-line tool for Google Cloud. It comes pre-installed on Cloud Shell and supports tab-completion.
- (Optional) You can list the active account name with this command:
gcloud auth list -
Click Authorize.
Output:
ACTIVE: * ACCOUNT: "ACCOUNT" To set the active account, run: $ gcloud config set account `ACCOUNT` -
(Optional) You can list the project ID with this command:
gcloud config list projectOutput:
 [core]
 project = "PROJECT_ID"
Note: For full documentation of gcloud, in Google Cloud, refer to the gcloud CLI overview guide.
Task 1. Create a connection resource
BigLake tables access Google Cloud Storage data using a connection resource. A connection resource can be associated with a single table or an arbitrary group of tables in the project.
- From the Navigation Menu, go to BigQuery > BigQuery Studio. Click Done.
-
To create a connection, click +ADD, and then click Connections to external data sources.
Note: If you are prompted to enable the BigQuery Connection API, click Enable API.
- In the Connection type list, select Vertex AI remote models, remote functions and BigLake (Cloud Resource).
![add external data source] - In the Connection ID field, enter
my-connection. - For Location type, choose Multi-region and select US (multiple regions in United States) from the dropdown.
- Click Create connection.
- To view your connection information, select the connection in the navigation menu.
![my connection explorer] - In the Connection info section, copy the Service Account ID. You will need this in the following section.
Task 2. Set up access to a Cloud Storage data lake
In this section, you will give the new connection resource read-only access to the Cloud Storage data lake so that BigQuery can access Cloud Storage files on behalf of users. We recommend that you grant the connection resource service account the Storage Object Viewer IAM role, which lets the service account access Cloud Storage buckets.
- From the Navigation Menu, go to IAM & Admin > IAM.
- Click +GRANT ACCESS.
- In the New principals field, enter the service account ID that you copied earlier.
-
In the Select a role field, select Cloud Storage, and then select Storage Object Viewer.
-
Click Save.
Note: After you migrate users to BigLake tables, remove direct Cloud Storage permissions from existing users. Direct file access allows users to bypass governance policies (such as row- and column-level security) set on BigLake tables.
Task 3. Create a BigLake table
The following example uses the CSV file format, but you can use any format supported by BigLake, as shown in Limitations. If you’re familiar with creating tables in BigQuery, then this process should be similar. The only difference is that you specify the associated cloud resource connection.
Note: For optimal performance, we recommend using Cloud Storage single-region or dual-region buckets and not multi-region buckets.
If no schema was provided and the service account was not granted access to the bucket in the previous step, this step will fail with an access denied message.
Create a dataset
- Navigate back to BigQuery > BigQuery Studio.
-
Click the three dots next to your project name and select Create dataset.
- For the Dataset ID, use
demo_dataset. - For Location type, choose Multi-region and select US (multiple regions in United States) from the dropdown.
- Leave the rest of the fields as default and click Create Dataset.
Now that you have a dataset created, you can copy an existing dataset from Cloud Storage into BigQuery.
Create the table
-
Click the three dots next to
demo_dataset, then choose Create table. - Under Source for Create table from, choose Google Cloud Storage.
Note: A Cloud Storage bucket has been created with two datasets that you will use in this lab. - Click Browse to select the dataset. Navigate to the bucket named as Project ID and then customer.csv file to import it into BigQuery, and click Select.
- Under Destination, verify your lab project has been selected and you’re using the
demo_dataset. - For the table name, use
biglake_table. - Set the table type to External Table.
- Select the checkbox to Create a BigLake table using a Cloud Resource connection.
-
Verify that your connection ID
us.my-connectionis selected. Your configuration should resemble the following: -
Under Schema, enable Edit as text and copy and paste the following schema into the text box:
[
  {
    "name": "customer_id",
    "type": "INTEGER",
    "mode": "REQUIRED"
  },
  {
    "name": "first_name",
    "type": "STRING",
    "mode": "REQUIRED"
  },
  {
    "name": "last_name",
    "type": "STRING",
    "mode": "REQUIRED"
  },
  {
    "name": "company",
    "type": "STRING",
    "mode": "NULLABLE"
  },
  {
    "name": "address",
    "type": "STRING",
    "mode": "NULLABLE"
  },
  {
    "name": "city",
    "type": "STRING",
    "mode": "NULLABLE"
  },
  {
    "name": "state",
    "type": "STRING",
    "mode": "NULLABLE"
  },
  {
    "name": "country",
    "type": "STRING",
    "mode": "NULLABLE"
  },
  {
    "name": "postal_code",
    "type": "STRING",
    "mode": "NULLABLE"
  },
  {
    "name": "phone",
    "type": "STRING",
    "mode": "NULLABLE"
  },
  {
    "name": "fax",
    "type": "STRING",
    "mode": "NULLABLE"
  },
  {
    "name": "email",
    "type": "STRING",
    "mode": "REQUIRED"
  },
  {
    "name": "support_rep_id",
    "type": "INTEGER",
    "mode": "NULLABLE"
  }
]
Note: Typically, data lakes do not have a predefined schema. For this lab’s purposes, we are using one to make setting column-level policies clearer.
- Click Create Table.
- Click Check my progress to verify the objective.
Task 4. Query a BigLake table through BigQuery
Now that you’ve created the BigLake table, you can use any BigQuery client to submit a query.
- From the biglake_table preview toolbar, click Query > In new tab.
-
Run the following query in the BigQuery Editor:
SELECT * FROM `Project ID.demo_dataset.biglake_table`Click Run.
- Verify you can see all of the columns and data in the resulting table.
Task 5. Set up access control policies
Once a BigLake table has been created, it can be managed in a similar fashion to BigQuery tables. To create access control policies for BigLake tables, you’ll first create a taxonomy of policy tags in BigQuery. Then, apply the policy tags to the sensitive rows or columns. In this section, you will create a column-level policy. For directions on setting up row-level security, see the row-level security guide.
For these purposes, a BigQuery taxonomy named taxonomy name and an associated policy tag named biglake-policy has been created for you.
Add policy tags to columns
You will now use the policy tag you created to restrict access to certain columns within the BigQuery table. For this example, you will restrict access to sensitive information such as address, postal code, and phone number.
- From the Navigation Menu, go to BigQuery > BigQuery Studio.
- Navigate to
demo-dataset > biglake_tableand click the table to open the table schema page. - Click Edit Schema.
-
Check the boxes next to the address, postal_code, and phone fields.
- Click Add policy tag.
-
Click taxonomy name to expand it and select biglake-policy.
-
Click Select.
Your columns should now have the policy tags attached to them.
- Click Save.
Verify your table schema now resembles the following:
Note: The warning signs on the columns signal you don’t have access to those particular fields based on the security policies in place.
Verify the column-level security
- Open the query editor for
biglake_table. -
Run the following query:
SELECT * FROM `Project ID.demo_dataset.biglake_table`Click Run.
-
You should receive an access denied error:
![access denied error] -
Now, run the following query, omitting the columns you don’t have access to:
SELECT *  EXCEPT(address, phone, postal_code)
FROM `Project ID.demo_dataset.biglake_table`
Click Run.
The query should run without any issues and return the columns you have access to. This example shows that column-level security enforced through BigQuery can also be applied to BigLake tables.
Task 6. Upgrade external tables to BigLake tables
You can upgrade existing tables to BigLake tables by associating the existing table to a cloud resource connection. For a complete list of flags and arguments, see bq update and bq mkdef.
Create the external table
- Click three dots next to
demo_dataset, then choose Create table. - Under Source for Create table from, choose Google Cloud Storage.
- Click Browse to select the dataset. Navigate to the bucket named
Project IDand theninvoice.csvfile to import it into BigQuery, and click Select. - Under Destination, verify your lab project has been selected and you’re using the
demo_dataset. - For the table name, use
external_table. -
Set the table type to External Table.
Note: Do not specify a Cloud Resource connection yet.
-
Under Schema, enable Edit as text and copy and paste the following schema into the text box:
[ { "name": "invoice_id", "type": "INTEGER", "mode": "REQUIRED" }, { "name": "customer_id", "type": "INTEGER", "mode": "REQUIRED" }, { "name": "invoice_date", "type": "TIMESTAMP", "mode": "REQUIRED" }, { "name": "billing_address", "type": "STRING", "mode": "NULLABLE" }, { "name": "billing_city", "type": "STRING", "mode": "NULLABLE" }, { "name": "billing_state", "type": "STRING", "mode": "NULLABLE" }, { "name": "billing_country", "type": "STRING", "mode": "NULLABLE" }, { "name": "billing_postal_code", "type": "STRING", "mode": "NULLABLE" }, { "name": "total", "type": "NUMERIC", "mode": "REQUIRED" } ] - Click Create Table.
Update external table to BigLake table
-
Open a new Cloud Shell window and run the following command to generate a new external table definition that specifies the connection to use:
export PROJECT_ID=$(gcloud config get-value project) bq mkdef \ --autodetect \ --connection_id=$PROJECT_ID.US.my-connection \ --source_format=CSV \ "gs://$PROJECT_ID/invoice.csv" > /tmp/tabledef.json -
Verify your table definition has been created:
cat /tmp/tabledef.json -
Get the schema from your table:
bq show --schema --format=prettyjson demo_dataset.external_table > /tmp/schema -
Update the table using the new external table definition:
bq update --external_table_definition=/tmp/tabledef.json --schema=/tmp/schema demo_dataset.external_table
Verify the updated table
- From the Navigation Menu, go to BigQuery > BigQuery Studio.
- Navigate to
demo-datasetand double-clickexternal_table. - Open the Details tab.
-
Verify under External Data Configuration that the table is now using the proper Connection ID.
Great! You successfully upgraded the existing external table to a BigLake table by associating it to a cloud resource connection.
Congratulations!
In this lab, you:
- Created a connection resource.
- Set up access to a Cloud Storage data lake.
- Created a BigLake table from it.
- Queried the BigLake table through BigQuery.
- Set up column-level access control policies.
- Updated an existing external table to a BigLake table using the connection resource.
4. SECURE BIGLAKE DATA: CHALLENGE LAB (ARC129)
Overview
In a challenge lab you’re given a scenario and a set of tasks. Instead of following step-by-step instructions, you will use the skills learned from the labs in the course to figure out how to complete the tasks on your own! An automated scoring system (shown on this page) will provide feedback on whether you have completed your tasks correctly.
When you take a challenge lab, you will not be taught new Google Cloud concepts. You are expected to extend your learned skills, like changing default values and reading and researching error messages to fix your own mistakes.
To score 100% you must successfully complete all tasks within the time period!
Setup
Note: Use an Incognito (recommended) or private browser window to run this lab. This prevents conflicts between your personal account and the student account, which may cause extra charges incurred to your personal account.
Note: Use only the student account for this lab. If you use a different Google Cloud account, you may incur charges to that account.
Challenge Scenario
You are just starting your junior data engineer role. So far you have been helping teams create and manage BigLake assets.
You are expected to have the skills and knowledge for these tasks.
Your challenge
You are asked to help a newly formed development team with some of their initial work on a new project. Specifically, they need a new BigLake table from a Cloud Storage file with the appropriate permissions to limit access to sensitive data columns; you receive the following request to complete the following tasks:
- Create a BigLake table from an existing file on Cloud Storage.
- Apply and verify policy tags to restrict access to columns containing sensitive data.
- Remove direct IAM permissions to Cloud Storage for other users (after policy tags have been applied to protect the data).
Some standards you should follow:
- Ensure that any needed APIs (such as Data Catalog and BigQuery Connection API) are successfully enabled and that necessary service accounts have the appropriate permissions.
- Create all resources in the multiple regions in United States, unless otherwise directed. Each task is described in detail below, good luck!
Task 1. Create a BigLake table using a Cloud Resource connection
Create a BigQuery dataset named online_shop that is multi-region in the United States.
Create a Cloud Resource connection named user_data_connection (multi-region in the United States) and use it to create a BigLake table named user_online_sessions in the online_shop dataset.
Be sure to apply the appropriate service account permissions to read Cloud Storage files in your project. When creating the table, load data from the following Cloud Storage file using schema auto-detection:
gs://qwiklabs-gcp-00-62a529679d7e-bucket/user-online-sessions.csv
Task 2. Apply and verify policy tags on columns containing sensitive data
Use the precreated taxonomy named access_control-taxonomy-3xvxl to apply column-level policy tags on the table.
Apply the policy tag named sensitive-data-policy to the following columns in the user_online_sessions table:
ziplatitudeip_addresslongitude
Verify the column-level security by running a query that omits the protected columns.
Task 3. Remove IAM permissions to Cloud Storage for other users
Follow Google best practices after migrating data to BigLake by removing IAM permissions for student-04-a0e201e53f16@qwiklabs.net (User 2) to Cloud Storage.
Leave the IAM role for project viewer.
Remove only the IAM role for Cloud Storage.
💡 Solution here
🚀 Steps to Execute in Cloud Shell:
export USER_2=student-04-a0e201e53f16@qwiklabs.net
curl -LO raw.githubusercontent.com/QUICK-GCP-LAB/2-Minutes-Labs-Solutions/refs/heads/main/Secure%20BigLake%20Data%20Challenge%20Lab/arc129.sh

sudo chmod +x arc129.sh

./arc129.sh